Monday, September 19, 2011

Blacksmith's Coal: Filling the Coal Bin for another year!


Each year our shop uses about two tons of bituminous coal. Our fires are burning in the forge seven days a week for half the year, and are busy throughout the winter months as well. Each fall it is our chore to refill the coal bunker.  It is a woeful site to see an empty coal bin!  You can see the line from the coal when full on the bricks of the upper right side of the coal bunker.


The Fields Blacksmith Shop coal bunker built into the hill behind the shop. It is like a stone and brick tunnel that goes 14 feet into the hillside underground. There is no way to put coal into it from the outside. All the coal is hauled through the shop and into the bin using a wheelbarrow.


The coal to fill the bin is waiting outside the shop. We shovel a wheelbarrow full of coal and wheel it through the shop. Weave it around the anvil and tools then push it up a ramp. Keep pushing hard as it plows through the coal and stop when you reach the back wall. Pull one of the removable sides off the wheelbarrow and dump it sideways. As the coal piles up the roof is too low to dump the barrow forward!

Keep loading and pushing the wheelbarrow. It takes 15 shovel loads to fill the wheelbarrow. Each load make a small difference in the pile. It may take around 100 loads to get it all in. Here is what the pile looks like after 35 loads have been taken into the coal bin. We are making progress! Only 65 more trips!


After bringing in 5 wheelbarrow loads a shovel is used to level the pile in the bunker. You have to make a path for the wheelbarrow to drive up the coal to dump the next 5 loads! Keep piling it up until the wheelbarrow won’t fit over the coal and starts hitting the roof. Then keep filling in front of the pile until the coal bin is full. 


It is a long and steady job to fill the coal bin for the next year. It usually take us about two weeks. We try to do at least an hour of moving coal each morning. It is better to move the coal in a light rain, as then the damp coal doesn’t make any dust. It isn’t much fun loading coal in a cold September drizzle. Hopefully we will get it done before October.  At least when it is done the coal will  be stored accessible from inside the shop and dry.  We won't have to go outside in the winter and shovel a path through the snow to get some coal!


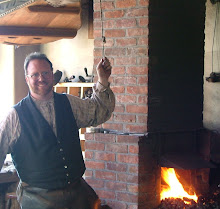
Coal is something that warms you twice.  You are warmed once when you move it and again when you burn it!  If you visit the Fields Blacksmith Shop you can see for yourself how much progress we have made, and how much is in our coal bin. 

Wednesday, August 10, 2011

For the want of a little forged hook - Making Hardware at the Blacksmith Shop.

Our Blacksmith shop has played a restoration and repair role within The Farmers’ Museum since 1946.


We never know what project will come in next for repair or what will need to be made. One of the smallest jobs this July was a request from the Farmers for a small hook. It proved to be a small job with an important effect!


The Farmers came to the shop and said,


“We need a little forged hook.”


I asked, “Why to you need a hook?”

They replied, “To hold a string.”


I wondered, “Why do you need to hold the string?”

They replied, “To hold the door.”

I asked, “What door?”

They replied, “The Brooder House door."

"What does the Brooder House do?"

“It holds the hen that sits on the eggs.”


So it turns out they needed a hook to hold the string,

They needed the string to hold the door,

the door to that closes the Brooder House,

the Brooder House that holds the hen,

the hen that sits on the eggs,

the eggs to hatch eleven chicks!

Which the little hen did!


So indirectly my little hook led to there being eleven new Dominick chicks at The Farmers’ Museum! Little things like forged hooks and unhatched eggs can have big results. 


Sunday, July 31, 2011

Introduction to Engraving Steel - Classes coming in August and October 2011!


We teach a wide variety of classes in traditional craft at The Farmers' Museum.  I am particularly proud to offer a new class on engraving steel using traditional hand tools.  The instructor is Paul Spaulding, Master Blacksmith and the engraver of our Scottish Pistol Project.  He will guide students through the theory and methods of engraving steel.  Each class will have a maximum of 6 students.  All will have a full set of tools provided to practice engraving.


The Introduction to Engraving Steel with Hand Tools is a two day class.  The cost is $150 for a two day class with group and individual tutorials.  It is offered August 6th and 7th, as well as October 8th and 9th.  The August class has openings.  For more information or to enroll call The Farmers' Museum at 607-547-1461. 


Students will learn tips on how to design and lay out projects, and the basic methods of using a hand engraver and hammer to engrave steel.  Attention will also be spent on how to choose the type of engraving chisel for the work as well as how to sharpen, hold, and use the engravers. 


You are not likely to have mastered engraving by the end of the course but will have a firm foundation to begin practicing on your own.  If you have an urge to try your hand at engraving steel using simple traditional tools this may be the place to start!

Thursday, March 24, 2011

Making Tools for the Anvil: Bottom Swage

One of the pleasures of blacksmithing is the ability to make new tools as needed. We needed some bottom swages for use in the anvil to complete a current project. We made them as needed. This is just one way to make them, as it suited the tools available in our traditional shop.

Start with a piece of steel with enough mass for the tools.  In this case we used a piece of steel cut from a hammer head.  Square it to the desired size and start the job.

Any tool used in the anvil needs a square stem to hold it in place in the square Hardy hole of the anvil.  We achieved this by fullering the piece down to the desired size using a handled fuller, a striker with a sledge hammer, and the anvil.

Fullering the hardy stem:

Here you can see we have the hardy stem well formed:
Once the hardy stem is done, it is time to shape the working end.  The face of the tool is taken to a forging heat, placed in the hardy hole, and the appropriate sized groove sunk into the face by driving a tool into the hot steel.

Sinking the die impression:

We cleaned up the forged die with a rasp (file) while it was still hot.:

Then we examined the die for problems or areas that need more work:

Here is the finished die and one of the collar pieces it was created to shape:
Some projects require making more tools than others.  Our ongoing weathervane project has led to the making of custom tongs and two sizes of bottom swage tools for the anvil.  Now that we have these tools, it expands the options of tools that can be used for future projects.

Tuesday, February 1, 2011

Old Anvils

The 1827 Peleg Field Blacksmith Shop is lucky to be so well-equipped with anvils.  They are the fundamental, cornerstone tool of the shop.  

Our oldest anvil is probably much like one that Mr. Peleg Field would have seen and used during his apprenticeship in the 1780’s.  It is an English pattern “5th foot” anvil.  That nickname comes from that fact that it has 5 feet, not 4!  Chunky and squat, this style of anvil was made by teams of trained smiths working to forge the anvil from up to 11 pieces of wrought iron and then forge welding a steel plate onto the face.  While often only around 120lbs, this would have been a blacksmith shop primary anvil in the 19th century.  This style with the 5th foot harkens back to features found on anvils in the 17th and even 16th centuries.


This Vulcan Works anvil from Sheffield is a transitional anvil (below).  Probably made in the late 18th or  first third of the 19th century, it bridges the gap between the small and squat older style and the larger and longer London or American Pattern.  This anvil still has the small horn of the earlier style but also has the thinner heel of the London Pattern.

The Peter Wright anvil below was made in London, England in the mid-19th century.  It is the shape that most people recognize in the United States as a modern anvil.  It is around 155lbs.  The larger horn and long thin heel of the anvil face makes this a versatile tool.  This is the anvil we use at the front forge in the Field Blacksmith shop.
At the back forge is a larger anvil made in the same style as the Peter Wright at the front forge.   Larger than the previous anvil, it is around 180lbs.  You can feel the benefit of that extra mass when using it.  It provides a very solid surface for larger work like hinges and wagon parts.

Anvils were such common tools in daily life and last such a long time, that there is a surprising amount of diversity among old anvils.  Unlike other items that are 150 to 300 years old, anvils are generally considered tools rather than antiques.  With good care, these anvils will be in use as we work and demonstrate to the public for decades to come.  

Monday, January 24, 2011

The Weathervane Project, Part II: Forging diamonds.

Our Weathervane Project has several different shapes as part of the design.   C-scrolls, tulips, and diamonds are repeated themes.  Let’s look at how the diamond forms are created at the forge.

They are formed from low-carbon steel bar that is ¼” by 2” by about 5” long.   The first 3" will be used to form the diamond shape and the rest formed into the tail approximately 5/8" thick and 2.5" long.
The diamond shape is forged out of the bar over the edge of the anvil.  This takes several heats and goes faster with assistance from a striker with a sledge hammer.  This one is half done:
The finished diamond then is forge-welded to the crossbar.  That is done by two smiths working together to hold and weld the pieces together into a finished bar.
The welded bar is quenched in water and cleaned up.

The diamond is then framed by two scrolls to create a form of a Fleur De Lise.  This one doesn't have the final collar yet but is still quite striking in silhouette.

Tuesday, December 28, 2010

Happy Holidays 2010

As we head through December toward the New Year snow has been falling and the days are getting shorter and darker.  The wood stove in the Blacksmith shop makes a cheerful smoke plume in the morning.


Each day we light the wood stove and also the coal forge.  Here the coal fire is just starting to burn well. 


Happy Holidays and best wishes for a safe, happy, and prosperous New Year! 

Blog Widget by LinkWithin