Thursday, August 12, 2010

Traditional Hinges on Doors and Gates

The repair and replacement of historic hardware is a steady part of our job at the Peleg Field Blacksmith Shop. When a garden gate needs new pintles to hold the hinges, or a barn hinge needs repair, we do what is needed. Here is a pictorial tour of some of the many kinds of hinges at The Farmers’ Museum.

Dimmick House gate with beveled barrel, self-closing pintle hinges.


The solid and workmanlike hinges on the Field Blacksmith Shop door.

Dr. Thrall’s Pharmacy Garden gate with a graceful pintle and gudgeon:

The Lippitt Farm Smokehouse door.


And the 4-hinge split door to the sheep pen in the Brooks Barn, with sheep!


As you can see, traditional hardware is alive and well at The Farmers’ Museum.  It is not complicated to make, is easily maintained, and lasts for centuries. If the hardware on your garden gate should fail, don’t come unhinged! Fire up a forge and make some traditional pintles and gudgeons.

Monday, August 2, 2010

Scottish Pistol -Part III - Welding the barrel.

Our Masterpiece Project from 2007 to the present (2010) is a long-term research project to rediscover the methods used to build an all iron and steel Scottish Pistol. The previous articles of the Scottish Pistol Project discussed the history of the Pitcarn Pistol, it’s role in our Revolutionary War, and the first challenges of making our pistol.
After completing the stock, the next challenge was to forge-weld a barrel for the pistol from wrought iron. The raw material was real wrought iron reclaimed from an old ox cart wheel's tire. Wrought iron forge-welds well at a high temperature, and is somewhat self-fluxing.  The iron is taken to a high welding heat in the coal forge, fluxed, and then forge welded into a tube using the anvil and a swedge block.  The logitudinal bending is started in a swage block or between the face and step of the anvil.  About one hammer width is rolled at a time, trued up, and forge welded.

The wrought iron is welded into a tube with a small pilot hole down the center.  After welding, a pass in the swage block helps to create a smooth, cylindrical barrel.

The next step is to turn the now round bar into a barrel. These pistols were smoothbore, so we don’t need to worry about rifling. The small pilot hole must be enlarged to make a finished bore. Our only “power tool” is a foot-treadle lathe. It isn’t able to generate the horsepower to drill out a .52 caliber bore. Instead we remove a small amount of metal at a time using reamers.

A succession of 6 or more reamers are used in the foot treadle lathe to turn the initial welded pilot hole into a round and true bore.  This takes up to 45 minutes per pass and up to two days for the whole process.  At the conclusion of the process the barrel has progressed from an irregular .30 caliber bore to reach our target bore diameter. 

If there is no visible weld seam, the barrel may pass.  A visible seam at this stage will condemn a barrel to display status.  Here is one that failed inspection.  Note the spiral line.  That is not rifling, but rather is a flaw in the wrought iron.  This barrel had internal flaws and slag inclusion in the iron.  The only thing to do is to start over with another piece of iron and forge another barrel.


Here is the interior view of a barrel that passes inspection.  Hurray!

Once a barrel has the desired interior bore, the work commences on the exterior!  These pistol barrels are highly ornate.  They are turned on the lathe to true the interior to the exterior.  Then the round rings or “wedding bands” are turned.  Much of the rest of the fluting, carving, and design is done with files and engraving chisels.  It can take several days to complete the exterior of the barrel.
 
The next step is to carefully make the breech plug and to file the barrel to precisely fit into the forged stock.  That has been done on the barrel above.  Our next article on this project will discuss making the lock mechanism that will fire the pistol.

Wednesday, July 28, 2010

Scottish Pistol Project - Part II

Field's Blacksmith shop is in the last quarter of a project to reproduce a traditional Scottish Pistol.  You can read about the start of this project here.  The task of the first summer of the project was to rediscover how the stock of the pistol was created.  Hollow, and made of one piece of sheet iron, the secret of how the apprentices and master gunsmiths of Doanne, Scotland constructed this pistol, remains a secret.  The Smiths leading the project researched and developed a pattern for the stock.  It took a lot of trials and adjustments. 

Here is an image of the pattern for the stock:
The stock, or frame, of this style of pistol is forged from one piece of flat steel. There is no wood in the pistol. This form of pistol frame involves bending, folding, and stretching a flat piece of steel to create a hollow 3-dimensional frame. The secret method of making this part would have been passed from master gunsmith to apprentice in the gunsmithing community of Doane, Scotland. Their method does not seem to have been leaked or written down, so we had to rediscover it by trial and error. This took a year of Saturdays and involved making over a dozen tools that would be needed to re-create the frame. The pattern was adjusted again and again until it yielded success.


This was particularly difficult due to the need to create both the pattern and the tools needed to shape this complex piece.
The next step is to file the stock smooth and begin the engraving.  The engraving is laid out with a pencil or a scribe, and then is engraved into the steel. It is a precise job that requires patience and skill.  It will take most of the Saturdays of 2010 to finish the engraving and the final fitting of the pistol.

This has been a long term project. We only work on it in the shop on Saturdays during the summer. We are now entering our 4th, and hopefully final, summer. The pistol frame is fully formed, filed, and is slowly being engraved. If you visit this on a Saturday this summer (2010) you will see the smiths at work finishing the engraving and final fitting for our Scottish Pistol Project!

Monday, July 19, 2010

Sharpening the Scythe by hammer and stone.

The old saying tells the farmers to “make hay when the sun shines.” That isn’t a metaphor, it is job advice. Our farmers at The Farmers’ Museum harvest hay, winter rye, wheat, oats, and barley! All of those crops are harvested with a scythe. Cutting starts early in the morning with the dew on the grass which makes the hay heavy and easier to cut. The farmers take breaks for water and to sharpen the scythe. It makes for a long day in the sun , heat, and dust.
The working end of the scythe is a blade of hand hammered steel between 18 and 33 inches long. It is used with a curving, sweeping motion rather than a chopping motion. On a traditional farm, a scythe gets several weeks of use each year. They get dull in use, and need to be sharpened up to several times an hour.

The farmer reaping hay or grain would have to stop work in the field when the scythe gets dull.  They stop several times per hour, throughout the day, for sharpening. That would often be done using a whetstone -- a cut piece of naturally abrasive stone that is used to hone the edge.
The blade periodically needs more than honing with the stone. It needs to be peened out to thin the edge. This achieves several things. It fills in any nicks and dents in the blade. It re-profiles the edge to a nice thin taper. Finally, it prepares the blade for a final honing to achieve a razor edge.

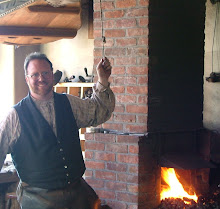
Here is Farmer Wayne peening the scythe blade in the blacksmith's shop.

This peening is done on a scythe anvil. This is a small, portable anvil that can be driven into the top of a stump or fencepost and be used in the field. These were used by farmers in many countries. The name for them in German is a “denglestock”, because the little anvil dangles from the farmer’s belt on a cord.

Scythe anvil:
The days were long and full for a farmer during harvest season. Cutting hay and grain was always done on sunny days to allow the grain or hay to dry. Their work was long and hot.  The days were long and hot for the blacksmiths as well as we repaired the farmer's scythes, mended wagon wheels, and reshod their horses.  The reward from long hours of reaping was a barn full of hay and grain.  A full barn provides the promise of prosperity in the comming year.

Winter Rye:

Thursday, July 15, 2010

The Scottish Pistol Project - Part I.

The Peleg Field Blacksmith shop has undertaken a number of challenging projects over the years. Our current Masterpiece Project involves building a Scottish Pistol inspired by one that played a role in the American Revolutionary War.  This project is to research and recreate the methods of building a Scottish all iron and steel pistol using methods accurate to the 18th century.

Our project is inspired by the surviving pistols of British Marine Major John Pitcarn.  He is the officer that ended up commanding the troops launching the raids on Lexington and Concord.  Those are regarded as the first battles of our war for independence, and the first shot fired in anger is referred to as the “Shot heard around the world”.  That shot was attributed by some as having been fired by Maj. Pitcarn from one of these pistols. 

From a blacksmith’s perspective, this pistol presents several technical challenges.  It is a muzzle loading, black powder flintlock type.  The entire pistol, including the frame and stock, are made of iron and steel.  The whole pistol is filed until it is smooth and white, and then is thoroughly engraved in detail.

Here is an image of the engraving process:

Our project to build a Scottish-style 1740’s pistol began in the summer of 2007 and is led by Master Smiths Paul Spaulding and Robert Cerny, with able assistance from smiths Robert Manker and Travis Edgington.  They began by researching what is known about this style of pistol, making tools, and producing the major components.  The major challenges were forming the stock, forge-welding the barrel, creating the flintlock mechanism, and performing the engraving.  Future installments of this series will detail those challenges. Stay tuned for updates appearing occasionally until we have completed the Scottish pistol --lock, stock, and barrel!

Friday, June 25, 2010

Wrought Iron

The term “wrought iron” has come to mean different things to different people. To a blacksmith, it refers to a raw material, not a type of work. In the first half of the 19th century, much of the nation’s wrought iron was made in the mountains of Pennsylvania and in the Adirondack Mountains of New York. It was made right on the mountainside where it was mined, and was smelted in a furnace called a bloomery. The newly smelted iron was called a bloom.
Wrought iron contained a small amount of a rocky impurity called “slag” which was silica from left over from the rocky ore. The more the iron is forged the more the impurities are worked out of the iron. As it was forged out, folded into layers, and re-welded it became more refined. Iron could be refined through the stages of muck bar, merchant iron, single refined, twice refined, and triple refined. Each refinement produced a finer grain within the iron and silica.
Here is a refined bar:
One way to identify wrought iron is to cut a bar partially through and then break it. If the break looks fibrous and stringy, it is likely wrought iron. You can see that in this cut piece:

Wrought iron is very tough, malleable, and forges nicely. However, it cannot be hardened for a good cutting edge.  That requires steel--an alloy of iron and carbon. Here is a traditionally forged hammer head that has a wrought iron body and a steel face forge welded on each end:
Wrought iron was the main material used by blacksmiths until the late 19th century. The Bessemer process of making steel directly from ore was used by Carnegie Steel, and was responsible for making steel cheap. As steel became more affordable in the late 19th century it helped produce a profusion of tools and hardware made of steel. Wrought iron continued to be made through the 1940’s but it never regained prominence as the primary metal of industry.

Thursday, June 17, 2010

Link by link, chain by chain.

Traditional blacksmith’s work is particularly satisfying when the item to be made is real and needed. Such is the chain maker’s lot. Forged chain was an essential tool that was in demand. It was used with horses and oxen to pull farm wagons, logging sleighs, and stone boats. Chain was used to anchor ships in the harbor. A forged chain was even strung across the Hudson River during our Revolutionary War to keep the British from sailing up river. Chain today is largely made by automated machines. But for over 1000 years (900 to 1900AD) chain was made link by link through craft and skill.

I have been making chain for the farmers to use with the oxen. Each link starts out as a 7-inch length of 3/8th-inch round bar. It is bent to a U shape.  Next, the link is prepared for forge welding. The ends are scarfed to a wedge shape and overlapped. They are heated and fluxed with borax to prevent iron oxide from impeeding the weld.  Working on the anvil and over the horn, the link is welded to a solid link and forged to a nice even oval shape.

When the smith has turned two-thirds of his pile of U-shaped links into nice welded ovals, the chain assembly begins.  Two welded links are scooped up with an open U.  The ends of that link are welded making a 3-link chain.  Once all of the links are joined in sections of three links each, then the smith starts joining sections of 3s together with an open link to make chains of 7 links.  Then, he joins two 7s with an open link to make 15s, then those to make 31s, and finally two chains of 31 with an open link makes a chain of 63 links.  Then, he might add a nicely forged hook to each end.

If all went as planned the chain is now 63 links, two iron rings, and two iron hooks!  It should be very close to 12 feet.  That is just right to use with oxen to haul the stone boat or the harrow in the field.
Throughout history chain was needed and highly valued. But it was also utilitarian and commonplace. Therefore, the chain maker’s work was essential and difficult, but carried no great prestige. If a swordmaker produced a blade with 500 layers of forge-welded steel, they were respected for having created a masterpiece. If a chain maker produced a chain with 500 forge welds they have made a 100 foot chain. It is just a half week's work.  Tomorrow, he would begin to make another chain link by link, foot by foot!  And be careful with those welds because everyone knows chain is only as strong at it's weakest link!

Blog Widget by LinkWithin